

the
seed pod newsletter
TOPIARY
PROJECT
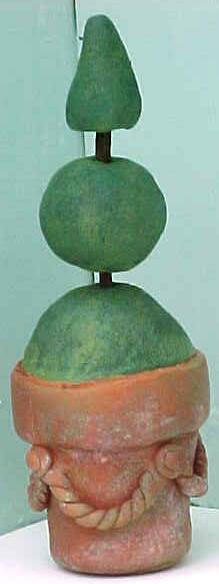
mr. crow is quite fond of topiary. he keeps his potted sculptures meticulously clipped. inspired by his handiwork i have come up with a wonderful polymer topiary for you to create and enjoy. of course you might want to alter this design some what and make a variety of these for your own miniature garden.
feel free to print out a copy of this copyrighted design for your project packet binder.
(to find out how to get more project packs email maria)
miniature topiary
supplies list:
- oven bake polymer, super sculpey
- 2 regular toothpicks ( 2 ľ")
- 1 ľ" wooden flower pot
- sculpting tool
- foil lined baking sheet
- dowel or rolling utensil
- ruler, scale, paper toweling
- assorted brushes (small,stipple and medium)
- folk art brand acrylic paints:
- #433 terracotta, #943 burnt sienna
- #940 coffee bean, #923 clover, #460 hauser green, and white.
- spray sealer,acrylic matte.
important: follow manufacturer's baking and safety instructions. do not reuse polymer tools for eating or baking food.
knead the polymer to prepare for use. press approximately one oz. into the pot opening. fill the opening about Ľ" from the top. roll a small ball of polymer. flatten ball out into a disk shape that is Ľ" thick and the size of the pot opening. place the disk on the top of the polymer that is in the pot (fig. 1). the polymer should now be flush with the top of the pot (fig. 2).
roll a 1 oz. ball. (fig. 3) hold as shown in fig. 4, pressing the thumb up inside of ball and pressing the top with first two fingers. continue to press and rotate until a dome shape is formed. the dome should be 1 ˝" across to cover the entire top of the pot. place dome on top of the pot (fig.5) - press and turn as in fig. 6. the dome edge should be flush with the pots' rim (fig. 6A).
use a ˝ oz. piece and roll out into a 3" solid tube shape (fig. 7). press tube flat with thumb to about 1/8" thick (fig. 7A). roll the thumb-pressed tube with a dowel to further flatten to a 5 ˝" strip that is a bit less than 1/8" thick (fig. 7B). wrap the strip around the neck of the pot so that the strip and the dome piece touch. press down firmly while wrapping (fig. 8). use the sculpting tool to trim and press/smooth the edges at the seam. (fig. 8A). use the tool's rounded edge to firmly press and form a rim where the dome and the strip meet. (figs. 8B and 8C). this is done by pulling the tool along the edge while at the same time applying pressure. note: the tool's rounded edge can be used to smooth out any lines or imperfections while working the piece.

flatten a 1 1/8 oz. piece by rolling or finger pressing to 5" x 2" x 1/8" thick. from this piece measure and cut a piece that is 4 Ľ x 1 Ľ". (fig. 9) set clippings aside. further roll this piece to 5" L x 1 ˝"W x 1/8" Thick using the dowel/rolling tool. even up edges by cutting with sculpting tool if needed. wrap the 5" piece around the bottom portion of the pot. use the tool to cut the ends and make a smooth seam where the 1 ˝"ends meet. trim all but 1/4" of excess from the under side of the pot.(fig. 10) use the sculpting tool to press together the top of the pot and the bottom of the rim so that no wood is showing under the pot's rim. press under the excess polymer at the bottom of the pot (fig.11A). flatten a Ľ oz. piece into a disk shape that is 1/8" thick and slightly smaller than the pot bottom. press the disk onto the pot bottom (fig. 11B). grasp the pot and press the bottom against a flat surface and gently rock to flatten the disk. use the tool to blend the edge of the disk with the bottom of the pot. use the tool to make an flat edge on the bottom of the rim by pressing and pulling tool along where pot meets rim bottom. touch up the pot with tool as desired.
tooth brush to texture the bottom tier of the topiary by pouncing on the polymer's surface (fig.12). mark a (2 ľ") tooth pick at 1" from one end. press the 1 ľ" end into the center of the bottom topiary tier down into the pot to the mark. cut off the top Ľ" of exposed tooth pick (fig.13).
using the clipping scraps or a ľ oz. piece of polymer, roll and texture a ball with the brush. press the ball onto the cut end of the tooth pick leaving a little less than ˝" of the tooth pick exposed (figs. 14 & 14A).
roll a Ľ oz. ball for the top tier. press where shown and rotate, repeat until a cone shape is formed (fig. 15A). texture the cone and insert a 1" piece of tooth pick Ľ" into the cone (figs. 15B 15C). insert the tooth pick end of top tier into the center tier of the topiary by setting the entire topiary on a flat surface and gently bracing the piece by holding the center tier on either side. a little less than ˝"of tooth pick shows (fig.15D). note:the unions of the tiers must be solid, if there is "play" in the area around the tooth pick(s) the piece will not hold together.
to make the coiled-braiding on the pot roll out (using aprox. Ľ oz.) four pieces that are about 4" long by 1/8" thick (fig.16B). cut one piece in half (fig. 16B)and press two of the ends together (fig.16D). hold the pressed end in one hand and guide the two loose ends (gently stretching them) in other hand while twisting the pressed end. the two pieces should wrap around each other to form a coil (fig. 16E). trim off ends. repeat for other three 4" pieces. lay the trimmed coiled braids in "U" shapes under the rim of the pot making each piece join with the next under the rim.(trim pieces if needed) once the pieces are evenly in place press slightly to secure to pot and use tool to press flat where pieces meet (fig.17). make two small balls to press flat (smallest ball on top of small ball) into a medallion that is placed at the intersection of the coiled braids. press one medallion on top of each place that the coils meet.
bake in foil-lined pan according to manufacturer's directions, checking often to prevent burning. allow to cool for several hours before painting. if any fissures or cracks occurred, use "plastic wood"- a wood fill product- to fill in. follow with fine sand paper to smooth. clean off dust before painting.
painting: allow drying time between each step. use paper toweling, an extra paint brush (dry or wet) to blot off or add paint for a time worn or moss covered effect. To dry brush: load brush then dabbing off almost all of paint on paper towel first, when the paint leaves a chalky look on the towel, the brush is ready to use.
paint the entire pot with #433 terracotta orange.(use two thin coats of paint vs.one thick coat). using the #943 and stipple or dry brush apply #943 randomly to the pot, apply under rim and on either sides (top and bottom) of coils. (make a third orange color by mixing the two colors together and dry brush over entire pot if desired.) use white paint diluted with water and blotted on a paper towel to dry brush over pot surface for a time worn look.(or dry brush some black on the pot for a different effect).
paint the sticks with #940 coffee bean. apply a second coat if needed. apply two coats of #923 clover green to all surfaces of topiary tiers. when dry apply #460 hauser green with a dry brush randomly about the green base coat. mix a small amount of white in with both of the greens to form other shades and randomly dab on in dry brush fashion until the topiary achieves your desired look. if desired, dry brush small dabs of green over the pot to look like moss. you can also antique stain the entire topiary if desired. once dry spray matte sealer over entire piece to stabilize.
© 2001 maria pahls - the seed pod
all rights reserved.
this sheet may be printed once
for personal use with illustrations.
this design is meant for fun,
not for production in any form.
Published to the internet
by arrangement with Homespun Peddler
ILLUSTRATIONSClick on the following links to view the illustrations on a page by themselves. You can then print that page to get a clean copy of the illustration
Use your BACK button to return to this page so you can get the next illustration.
copyright 2001 maria pahls~the seed pod
all rights reserved.
no part of this newsletter may be reproduced without written permission from the publisher, except by a reviewer who may quote brief passages in a review with appropriate credits; nor may any part of this newsletter be reproduced, stored in a retrieval system, or transmitted in any form or by any means -- electronic, mechanical, photo- copying, recording, or other -- without written permission from the publisher. photographs posted on homespun peddler site by permission of photographers and are protected under this copyright.Back to Issue 78
For more information send e-mail to the Peddler.
v211.0
HOME PAGE
Site designed at OJ Advertising, Inc.
Site developed and maintained by Mid-Michigan Computer Consultants
Report problems or suggestions to support@mmcctech.com
Jackie Gannaway Cookbook Cupboard Index.